 Field & Home
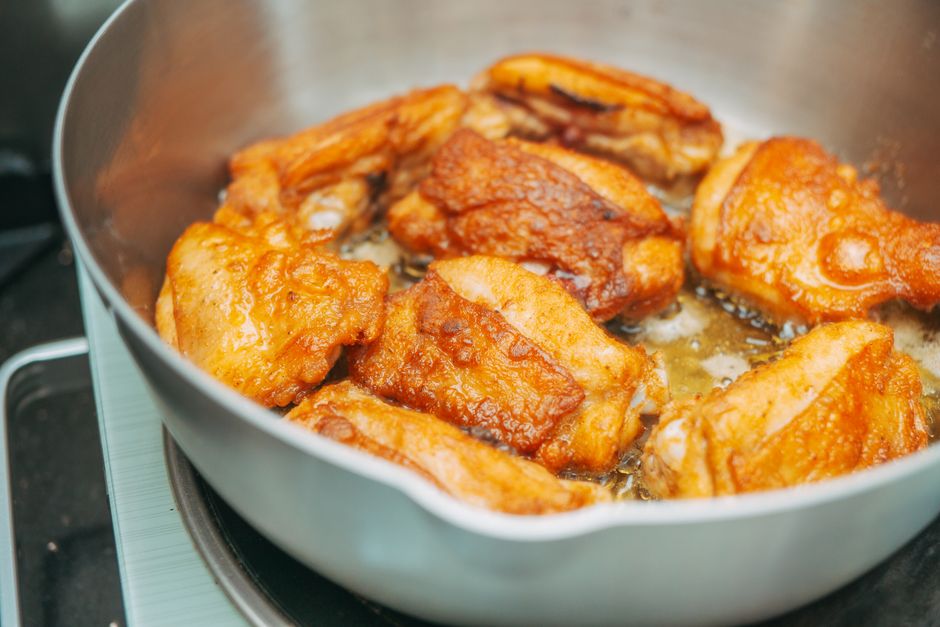
The short answer: Cast iron gives deeper sear and more residual heat; nonstick is faster to clean and safer for sticky marinades. Either pan can deliver crisp skin with the right oil, 400F oven finish and 25–30 minutes total cooking time.
Why crisp skin matters
Crispy skin is not just texture: it signals Maillard reaction and rendered fat, which add flavor and mouthfeel. For standard boneless or bone-in thighs about 1 inch thick, aim for 165 F internal temperature measured at the thickest point, then rest 5 minutes so carryover raises it to about 170 F. That resting time also lets juices redistribute so the meat stays moist while the skin stays crisp.
Start with skin-dry thighs. Pat each thigh dry with paper towels for at least 30 seconds per side; excess moisture is the enemy of crispness. Lightly season with 1 teaspoon kosher salt per pound and 1/2 teaspoon black pepper per pound, and let sit uncovered in the refrigerator for 30–60 minutes when possible—the dry surface promotes a better sear and shrinks the cooking time by 3–5 minutes.
Use a neutral oil with a smoke point above 400 F—1 tablespoon vegetable or grapeseed oil per 4 thighs is enough to coat the pan surface. A thin, even film helps conduction for a quick skin sear without excessive smoking. If you use butter, combine it with 1 tablespoon oil per 4 thighs to raise the burn point.
Optional quick wet brine: dissolve 2 tablespoons kosher salt and 1 tablespoon granulated sugar in 4 cups (1 quart) cold water, submerge up to 4 thighs for 30–45 minutes, then remove and pat completely dry. Wet brines add moisture and reduce oven time variance, but always dry the skin fully before searing to get crispness.
Tools checklist: have an instant-read thermometer, metal tongs, a 10–12 inch skillet for up to 4 thighs, a rimmed baking sheet 13×9 inches, a 6×6-inch wire rack if transferring to sheet, and oven mitts. Place a splatter screen or paper towels handy for blotting after resting.
Quick pan differences
Temps, rests, and oils that crisp thigh skin.
Dry 30 seconds a side
Pat 30 seconds per side plus 1 teaspoon salt per pound, chill 30 to 60 minutes uncovered.
Rest 5 minutes
Rest 5 minutes tented so juices settle and skin stays crisp to the bite.
Thickest-point 165 F plus a 5-minute rest coasts near 170 with moist meat.
Neutral oils over 400 F sear without smoking; butter alone burns, cut it with oil.
Ten to 12 inch skillets fit 4 thighs with air; crowding steams the skin soft.

Sear-and-oven method and timings
Preheat and placement: For cast iron, preheat a 10–12 inch skillet on medium-high for 5–8 minutes until the handle is hot and the pan retains heat when you flick a few drops of water (they should sizzle and evaporate). For nonstick, set medium-high for 2–3 minutes—do not overheat nonstick above 450 F. Use a pan that matches the number of thighs so they sit single-layer with 1/2 inch between pieces; crowding lowers surface temperature and adds 5–10 minutes to cook time.
Searing: Add 1 tablespoon oil to the hot pan and pat thighs again right before they touch the surface. Place thighs skin-side down and press lightly for 20 seconds to ensure contact. For cast iron, sear 4–6 minutes until the skin is deep golden-brown; for nonstick, sear 3–4 minutes until the skin lifts easily. Avoid flipping more than once; each flip loses heat and prolongs cooking by about 2–3 minutes.
Oven finish: Preheat the oven to 400 F and position the rack in the middle for even heat. After searing, flip thighs and move the skillet to the oven (use an oven-safe nonstick or transfer to a baking sheet lined with foil and a wire rack for non-oven-safe pans). Roast for 18–25 minutes depending on size—plan 20 minutes for 1-inch bone-in thighs and 18 minutes for 1-inch boneless thighs. Check internal temperature at the thickest part and remove at 165 F, then rest 5 minutes to reach about 170 F.
Thermometer technique: insert an instant-read thermometer horizontally into the center, avoiding bone by ~1/4 inch; check at two spots per thigh if uneven. If you measure 160 F in two spots, allow a 3–5 minute rest to reach the safe 165–170 F range via carryover heat instead of adding long extra oven time.
Finishing crisp: If the skin needs extra crisp after roasting, use broil: set the broiler element to high and move the rack so thighs are about 6 inches from the element, then broil for 1–2 minutes while watching continuously. Cast iron tolerates quick broil blasts better; nonstick pans should avoid direct broiler unless explicitly rated—transfer to a broiler-safe sheet for a 30–90 second finish instead.
Timing summary and workflow for 4 thighs: 5–8 minutes preheat (cast iron) or 2–3 minutes (nonstick), 3–6 minutes sear, 18–25 minutes oven, 5 minutes rest = roughly 30–40 minutes. For a weeknight, plan 25–30 minutes active time after preheat with a single cook person handling sear, oven transfer, and a 5-minute rest while you prepare a simple side.
Cleanup and care: For cast iron, cool 10 minutes, wipe with a paper towel, rinse with hot water if needed and dry on the stove for 1–2 minutes to evaporate moisture, then rub with 1 teaspoon oil to maintain seasoning. For nonstick, let cool 5 minutes, then wash with warm soapy water and a soft sponge; avoid metal utensils to preserve the coating and extend skillet life by an estimated 2–3 years compared with rough care.
“If you want the deepest crust, cast iron wins; if you value easy cleanup and gentle heat, nonstick is your friend. Both feed a family of four with excellent results when you control moisture and heat.”
—
Frequently Asked Questions
Further reading: Sheet-Pan Vegetable Combos with Crispy Edges · Grain-Bowl Formulas from Leftover Odds and Ends
Sources: FoodSafety.gov

2 responses