 Field & Home
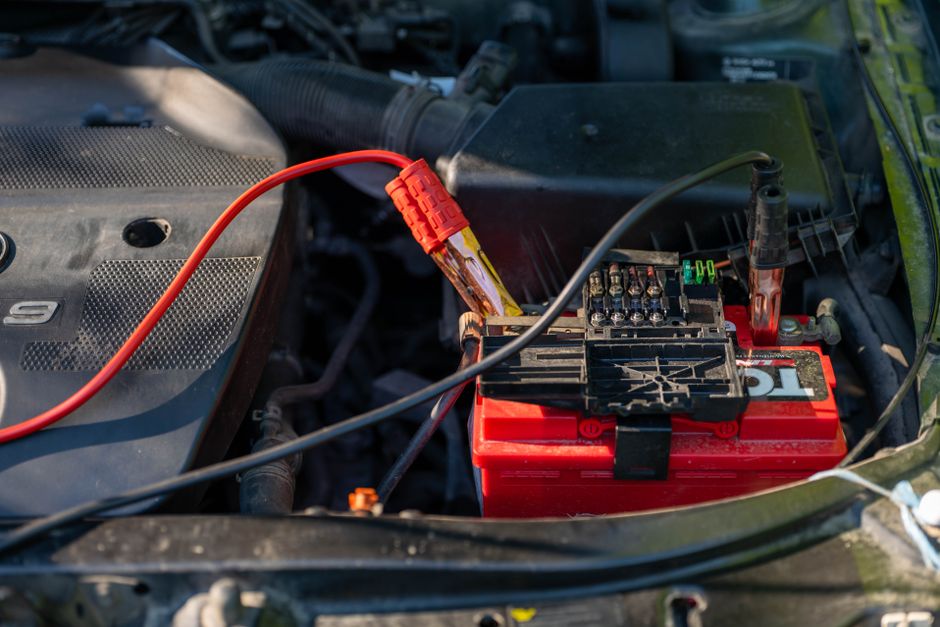
The short answer: A safe jump-start relies on the right clamp order, a solid ground, and timed cranking: follow the steps below and plan for 20 minutes of run time after a successful start.
Preparation and safety
Before you begin, gather tools and assess the scene. You need a set of jumper cables rated at least 400 A or a portable jump starter rated 800-1000 A for most 12 V cars, plus safety glasses and gloves. Park the donor vehicle bumper-to-bumper at about 30 cm separation or alongside with hoods open; engines must be off and both parking brakes engaged. Remove metal jewelry and keep children and pets at least 2 m away.
Inspect both batteries for cracks, bulging, or leaking fluid. If you see any white powder or wet corrosion on the terminals, clean it later (see troubleshooting) but do not attempt a jump if the battery case is cracked or the battery is leaking—replace it. Note that typical automotive batteries are nominal 12 V; a resting healthy battery reads about 12.6 V on a multimeter.
Identify the positive terminal marked “+” and the negative terminal marked “-“. If terminals are heavily corroded, loosen the clamps slowly; a poor connection reduces current flow and can prevent starting. Have a flashlight and rags handy, and plan for roughly 20–30 minutes total time on a routine jump-start, including setup and post-start charging.
Essential gear
Gear checklist
Jumper cables rated 400 A or higher; portable jump starter (800–1000 A) if you prefer not to use another car; safety glasses; insulated gloves; wire brush and baking soda for corrosion cleanup; a multimeter for a 12 V check.
Jumper cables
- Jumper cables cost less and work with any running donor car but require a second vehicle and a helper.
- Choose cables if you have access to a donor car.
Portable starter
- A portable starter lets one person work alone and can be stored in the trunk but needs periodic charging.
- Choose a starter if you often drive alone or in remote places.
Step-by-step jump-start procedure
1) Position & prepare: Place both cars in park or neutral and switch off ignitions, lights, and accessories. Engage parking brakes. Open both hoods and locate battery posts. If the dead battery is in a cramped location, find a suitable unpainted metal engine bolt or bracket to use as the grounding point for the final clamp—pick a point at least 30 cm from the battery.
2) Cable connection order: With both vehicles off, connect the red (positive) clamp to the positive terminal of the dead battery, then the other red clamp to the positive terminal of the donor battery. Next, connect the black (negative) clamp to the negative terminal of the donor battery. Finally, connect the remaining black clamp to the unpainted metal ground on the dead car, not the negative battery post. This reduces spark risk; keep clamps from touching each other.
3) Donor engine and warm-up: Start the donor car and run it at a moderate engine speed—about 1,500 rpm—using a light throttle for 2 to 3 minutes. If using a portable jump starter, switch it on according to the manufacturer and ensure the unit has a solid green ready indicator before attempting to start the car.
4) Cranking the dead car: Attempt to start the dead vehicle for no more than 10–15 seconds per try. If it fails, wait 60–90 seconds between attempts to avoid overheating the starter. Limit to 3 attempts; if the engine does not start after three tries, stop and re-check connections and battery condition or seek professional help.
5) After the engine starts: Once the dead car starts, leave both engines running for at least 5 minutes before disconnecting cables if using a donor vehicle. Better: keep the revived car idling for 20 minutes or drive for 15–30 minutes to allow the alternator to restore charge. If you used a portable starter, follow the maker’s instructions to disconnect immediately after the engine runs.
6) Disconnect order: Remove clamps in reverse order of connection: first the black clamp from the grounded point on the previously dead car, then the black clamp from the donor battery, then the red clamp from the donor battery, and finally the red clamp from the revived battery. Avoid touching clamps together during removal.
Troubleshooting and maintenance: If the car starts but dies soon after, the alternator may not be charging; test while running—the charging voltage should read between 13.7 V and 14.7 V on a multimeter. If corrosion prevents good clamp contact, mix 1 tablespoon of baking soda into 1 cup of water, apply with a toothbrush, rinse with water, and dry before reconnecting; allow at least 5 minutes to dry.
Additional tips: Never lean directly over the battery during a jump. If battery terminals are too small for clamp jaws, use an adapter lug or call roadside assistance. Expect a revive from a weak but not failed battery if you let the donor run at higher idle for 3–5 minutes before cranking; avoid revving the engine above 2,000 rpm.

Frequently Asked Questions
Further reading: Turnaround Times: Beating Darkness Safely · What Size Fireproof Home Safe Do Your Documents Actually Need?
Sources: This Old House


